$sudo apt-get install libapache2-mod-php5 php5-cli php5-common php5-cgi mysql-server php5-mysql
$sudo apt-get install build-essential
$sudo apt-get install libapache2-mod-perl2 php5-gd libxml-simple-perl libcompress-zlib-perl libdbi-perl libdbd-mysql-perl libapache-dbi-perl php-pear php5-dev libnet-ip-perl
$sudo apt-get update
$sudo apt-get upgrade
$sudo wget ftp://linvinus.ru/ocs/1.3.2/OCSNG_UNIX_SERVER-1.3.2-linvinus-with-utf8_patch.tar.gz
$sudo tar xvf OCSNG_UNIX_SERVER-1.3.2-linvinus-with-utf8_patch.tar.gz
$ cd ocsinventory-server-1.3.2
確認以上套件都有裝入後,即可執行
$ sudo sh setup.sh
跳出來選項都使用預設值即可,安裝完成後,需重新啟動apache2
$sduo service apache2 restart
登入:http://伺服器IP/ocsreports/install.php做設定
1. 設定連結SQL,需和之前LAMP時設定SQL要一致,輸入完畢後,按『send』。
2. 按『送出查詢』
3. 點選『Click here to enter OCS-NG GUI』
4. 進入到登入畫面,預設帳密為『admin』
========================================================================================
安裝GLPI
先至官網 http://www.glpi-project.org/?lang=en 下載最新套件,已支援繁體中文。
$sudo wget https://forge.indepnet.net/attachments/download/974/glpi-0.80.4.tar.gz
$sudo tar xvf glpi-0.80.4.tar.gz
$ sudo cp -a glpi /var/www
$cd /var/www
$sudo chown www-data.www-data –R glpi
要是有遇到File does not exist: /etc/apache2/htdocs
解決方式:
這是因為一般網頁都會放在/etc/apachee2/htdocs裡,這個文件不見了,導致找不到網站,所以我們要找/etc/apache2/http.conf檔,並新增DocumentRoot /var/www,重啟apache就可以了,這應該是重新定義網站根目錄的位置。
登入: http://伺服器ip/glpi
1. 選擇語系:繁體中文
2. 同意條款
3. 點選『安裝』
4. 點選『繼續』
5. 設定連結資料庫,Mysql主機:localhost Mysql使用者:root Mysql密碼:使用者自定
6. 創建一個新的資料庫為『glpi』
7. 點選『繼續』
8. 設定完成,點選『使用GLPI』
9. 進入到登入頁面,預設帳密:『glpi』
10. 登入到主畫面,準備要開始設定與ocs-ng的資料庫做連結
11. 點選『設定』→『一般』,設定啟用ocsng模式為『是』
12. 點選『localhost』
13. 『設定』→『OCSNG模式』→『通用』OCSNG資料庫使用UTF-8 設定為『是』,點選『更新』
14. 『設定』→『OCSNG模式』→『一般資訊』,將所有的否設定為『是』,點選『確定』,完成。
以下網址是小弟參考的來源:
http://www.blogger.com/
http://blog.163.com/ywz_306/blog/static/1325771120114311516668/
http://blog.chinaunix.net/space.php?uid=210925&do=blog&id=8902
http://vicchen39.pixnet.net/blog/category/794287
http://hi.baidu.com/lue_liu/blog/item/2b83ed059ec511121c958365.html
以上我都有在實際環際安裝成功,但目前尚有發現幾個問題
1.download下來的檔案,會有亂碼,但可以用記事本開啟後,選另存新檔,編號選『ANSI』即可解決。
2.目前無法抓到WINDOWS 旗艦版 X64 的序號。
3.『Windows Registry 』已有設定了,但無法被啟用,還在找問題中.....!!!
答: 目前『Windows Registry 』已經有設定server了,但功能仍然無法被啟用,所以小弟有找到是以plug-in的方式想法來做
目前有找到的答案是:http://wiki.ocsinventory-ng.org/index.php/Plugins:MSofficeKey#Modifiy_the_engine
但尚未測試實做,預計這幾天會來實做,後續有成功會再po文!
2011年11月28日 星期一
2011年11月27日 星期日
Unbuntu 11.04 nginx新增proxy_cache_purge
$apt-get update
$apt-get upgrade
$apt-get install nginx build-essential libpcre3-dev libssl-dev zlib1g-dev
$sudo nginx –V 可以查原始安裝路徑
$sudo nginx –v 可以查套件版本
$tar –xvf nginx-0.8.54.tar.gz
$tar –xvf ngx_cache_purge-1.4.tar.gz
$cd nginx-0.8.54
$./configure --prefix=/usr --conf-path=/etc/nginx/nginx.conf --error-log-path=/var/log/nginx/error.log --http-client-body-temp-path=/var/lib/nginx/body --http-fastcgi-temp-path=/var/lib/nginx/fastcgi --http-log-path=/var/log/nginx/access.log --http-proxy-temp-path=/var/lib/nginx/proxy --http-scgi-temp-path=/var/lib/nginx/scgi --http-uwsgi-temp-path=/var/lib/nginx/uwsgi --lock-path=/var/lock/nginx.lock --pid-path=/var/run/nginx.pid --with-debug --with-http_addition_module --with-http_dav_module --with-http_geoip_module --with-http_gzip_static_module --with-http_image_filter_module --with-http_realip_module --with-http_stub_status_module --with-http_ssl_module --with-http_sub_module --with-http_xslt_module --with-ipv6 --with-sha1=/usr/include/openssl --with-md5=/usr/include/openssl --with-mail --with-mail_ssl_module --add-module=../ngx_cache_purge-1.4
出現./configure: error: the HTTP XSLT module requires the libxml2/libxslt
libraries. You can either do not enable the module or install the libraries.
$dpkg –l | grep libxml2
ii libxml2 2.7.8.dfsg-2ubuntu0.1 GNOME XML library
$sudo apt-cache search libxml2
libxml2-dev - Development files for the GNOME XML library
$sudo apt-get install libxml2-dev
$dpkg -l | grep libxslt
ii libxslt1.1 1.1.26-6build1 XSLT 1.0 processing library - runtime library
$sudo apt-cache search libxslt
libxslt1-dev - XSLT 1.0 processing library - development kit
$sudo apt-get install libxslt1-dev
再次執行./configure,又出現錯誤
./configure: error: the HTTP image filter module requires the GD library.
You can either do not enable the module or install the libraries.
$dpkg -l | grep GD
ii libgd2-xpm 2.0.36~rc1~dfsg-5ubuntu2 GD Graphics Library version 2
ii libgdk-pixbuf2.0-0 2.23.3-0ubuntu1 GDK Pixbuf library
ii libgdk-pixbuf2.0-dev 2.23.3-0ubuntu1 GDK Pixbuf library (development files)
ii php5-gd 5.3.5-1ubuntu7.2 GD module for php5
$sudo apt-get install libgdchart-gd2-xpm-dev
再次執行./configure,又出現錯誤
./configure: error: the GeoIP module requires the GeoIP library.
You can either do not enable the module or install the library.
$ dpkg -l | grep GeoIP
ii geoip-database 1.4.7~beta6+dfsg-1 IP lookup command line tools that use the GeoIP library (country database)
$sudo apt-cache search Geoip
libgeoip-dev - Development files for the GeoIP library
$sudo apt-get install libgeoip-dev
再次執行./configure,不會再出現錯誤後,即可執行打包了
$make
將原本在/etc/nginx/nginx.conf和/etc/nginx/site- available/default做備份,備份到家目錄底下。
完成後,即執行make install
$make install
參考資料來源:
http://blog.sina.com.cn/s/blog_474cf12b0100g278.html
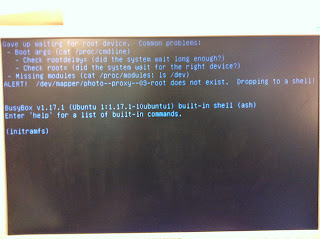
安裝Ubuntu server 11.04 on Dell R610
解決方式:
首先在這頁面輸入『exit』,然後就會出現『 login 』的字樣,登入系統後
step1: /etc/default/grub #設定檔 只要有關設定檔最好都先copy一份
#sudo vim /etc/default/grub
修改 GRUB_CMDLINE_LINUX_DEFAULT=”quiet“
將裡面的 quiet 改成 rootdelay=90存檔離開
step2:先將 /boot/grub.grub.cfg 做備份,可在更新後做比對有何差異
再執行 #sudo update-grub #showdown -r now
做完二個以上動作即可。
參考資料:
http://wiki.ubuntu-tw.org/index.php?title=GRUB_2_%E4%B8%AD%E6%96%87%E6%8C%87%E5%8D%97#.E6.AA.94.E6.A1.88.E7.B5.90.E6.A7.8B
http://skyyan.wordpress.com/tag/rootdelay/
Ubuntu 11.04 基本環境設置
1. Ubuntu 10.10之後的版本把『以任務配置標記套件』功能拿掉了,所以要在command line安裝 tasksel!指令為:sudo apt-get install tasksel。
2. /bin/bash為linux預設shell,但/bin/zsh更好用,所以想要安裝也是要在command line底下安裝,指令共有二個:sudo apt-get install zsh,安裝完後再下另一行更改 shell 指 令:chsh -s /bin/zsh,完成之後必須要重新登入,檢查指令:sudo echo $SHELL。
3. 『 screen 』,它是一個可以在terminal裡面顯示多個頁面的工具,還蠻好用的,安裝指令:sudo apt-get install screen,安裝完成後,在command line底下打screen,當然它的功能不止有顯示多個頁面,也可以透過修改設定檔來讓它變的更好用,預設的設定檔是在/etc/screenrc,我的習慣改任何設定檔前都會先做備份,以下是我自已參考別人的語法:
#加入狀態列
caption always "%{= bK} %{= bG} [%n]%t @ %H %{-} %= %{= bR}Loading: %l %{-} | %{= bG} %Y-%m-%d %c %{-}"
#hardstatus alwayslastline " %-Lw%{= BW}%n%f %t%{-}%+Lw %=| %0c:%s " 這段可加可不加。
# 將預設編碼設為 UTF-8
defutf8 on
#在編碼為UTF8底下看big5的檔案(Ctrl+a ,b/u)
# C-a b --(switch to)--> view big5 data
語法參考: http://vyoyov.blogspot.com/2011/04/linux-screen.html
bind b encoding big5 utf8
# C-a u --(switch to)--> view utf8 data
bind u encoding utf8 utf8
bind u encoding utf8 utf8
語法參考: http://vyoyov.blogspot.com/2011/04/linux-screen.html
FreeBSD Install PHP5 and PHP5 Extensions
一、要以root登入,且必須安裝port套件,如果port套件忘記安裝,先放入光碟片
1.#sysinstall
2.選擇Configur,然後按Enter
3.選擇Distributions,然後按Enter
4.選擇Ports,然後按Space
5.選擇Exit,然後按Enter
6.選擇要用的安裝來源,例如:CD-ROM、FTP等方式
7.選Exit,然後按Enter
8,按下X鍵就可離開sysinstall程式
#portsnap fetch 抓檔指令
#portsnap extract
#portsnap update
二、更新完之後,至/usr/ports/lang/php5
#cd /usr/ports/lang/php5
#make install
三、編譯完成之後,安裝php5套件
#make BATCH=yes install
#pkg_add -r php
四、編譯php5-extensions
#cd /usr/ports/lang/php5-extensions
#make install
五、編譯完成,並安裝
#pkg_add -r php5-extensions
六、查詢安裝套件和版本
#pkg_info | grep php
以上安裝皆會以最新的套件做安裝;測試安裝環境為freebsd 8.2 ( 32 bit )
參考來源:
http://www.freebsd.org/doc/zh_TW/books/handbook/ports-using.html
http://www.rhyous.com/2009/11/06/how-to-install-php5-and-php5-extensions-on-freebsd/
訂閱:
文章 (Atom)
